If you use your van for family holidays, weekends away or just for days out at the beach, chances are you are going to want to use some form of electrical appliance. A simple solution is to fit a leisure battery and wire it into your van’s charging system using a split-charge relay. Fitting a second battery allows you to power a cool box or fridge or charge a laptop or phone whilst driving or parked up, without running the risk of draining your main vehicle battery.
Just Kampers offers a range of of simple, easy-to-install split charging systems suitable for the VW T2 Splitscreen and VW T2 Bay, along with more modern Volkswagen T4, T5 and T6 models.
To illustrate how straight forward the procedure is, we installed one in one of our Early T2 Bays.
Tools you'll need:
You'll require a 13mm spanner, a screwdriver, cordless drill, cutters, wire strippers, crimp tool, three suitable self-tapping screws and cable ties. You'll also need a battery clamp and a leisure battery.
Stay safe:
As always, before commencing work make sure you remove the earth (marked negative) lead from your main vehicle battery.
How to install a split charging system to your classic VW camper:

From the spare tray on the left-hand side of the engine bay, lay the wiring loom across the back of the Bus, routing from left to right.

A good place to locate the relay is on the left hand d-post inner structure. Hold it in position and mark the top locating hole.

Drill this hole for the relay, and then mount the unit using a suitable self-tapping screw to ensure it's properly secured.

To save time, we usually use cable ties to fix the new wiring loom to the existing wires for the rear lights in the T2.

Remove the positive lead from the main battery and secure the new power lead under the battery clamp nut.

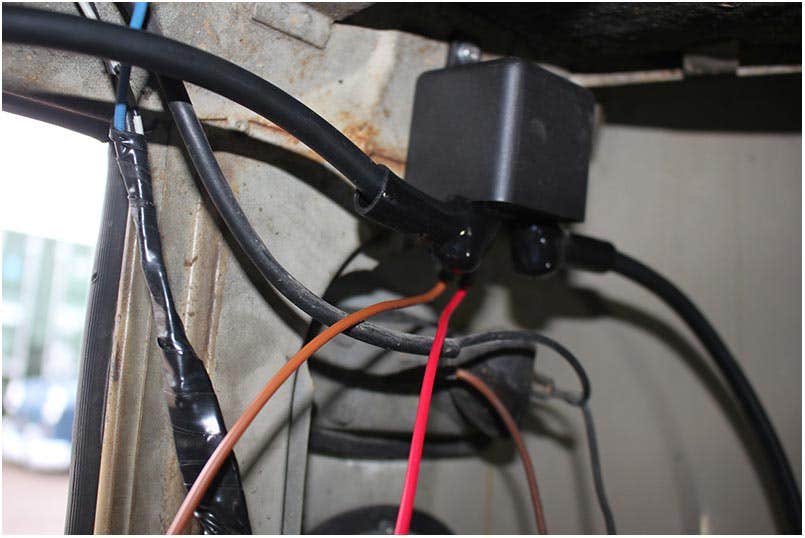
There are just two wires on the split charge relay. The brown wire goes to earth and the red (positive) wire needs to go to a switched live.
We utilised the existing tail light earth for the brown wire, and routed the cable under the engine bay tar board, then piggy-backed it to the switched live terminal on the ignition coil.

With the leisure battery now in place, install the auxiliary fuse box loom under the battery clamp nut.

You can now locate the fuse box on the rear inner wheel tub, where it will be out of the way but easy to access.

Next, install the leisure battery earth lead. This must be bolted to a good earth point.
On our Early Bay, we found an existing, factory-drilled hole on the inner d-post support and elected to use that. If no such hole exists, use an 8mm drill bit to create one.

Finally, you don’t want your new battery sliding around, so we used a Universal Battery Clamp to secure ours in place.
Once installed, connect the positive leads on both batteries, then the earths. All should now be up and running, just leaving you to wire any accessories forward from the new fuse box.
Split charging kits for your VW Campervan from Just Kampers
There’s nothing more frustrating than turning the ignition key at the end of a relaxing holiday or day out, only to hear the stomach-churning click that signals a flat battery. This is usually followed by at least an hours wait for your chosen recovery service to arrive. Not to mention the embarrassment!
Fitting a leisure battery and split-charge relay means you’ll never have that ‘Will it? Won’t it?’ moment again and can enjoy your time away in your Camper without worry.
In an attempt to make this essential upgrade as simple as possible, we’ve put together a range of easy-to-install kits with pre-made wiring looms, relays and fuse boxes connected. All you need to add is your choice of battery and a battery clamp.
Keeping your campervan's batteries topped up with trickle chargers
Installing a leisure battery is a great way to make sure your camper is much less likely to end up drained of power and unable to start, but how do you keep your leisure battery from running dry? A third battery? No need, just invest in a trickle charger!
Campervan trickle chargers are easy to set up, and use solar power to charge your camper's batteries, whether you've got a leisure battery wired into your circuit or not. We've got a great range of trickle chargers for all types of campers in stock right now at JK HQ, so take a look at the range below and take another step towards never running out of power while you're camping.

")
Looking to fit a leisure battery to your VW T6 & T6.1?
If you're keen to get a leisure battery for your Volkwagen camper, but you've got a modern VW T6 or T6.1, then take a look at our how-to video below to find out how. We installed a leisure battery system into Project 22, our VW T6.1 which we transformed from an entry-level van into a dream camper, and filmed the process to help you do the same in your campervan.

Updated with new information on 20 January 2022
Learn more about solar panels and your campervan
We've got a range of different guides around solar panels and solar power for your campervan, to help you make informed choices about the size, type and number of solar panels you might need to keep your

Power Up: De-Mystifying Solar Panels
Read our quick guide on understanding how solar panels work, how to calculate the amount and type of solar panels you'll need, and more!

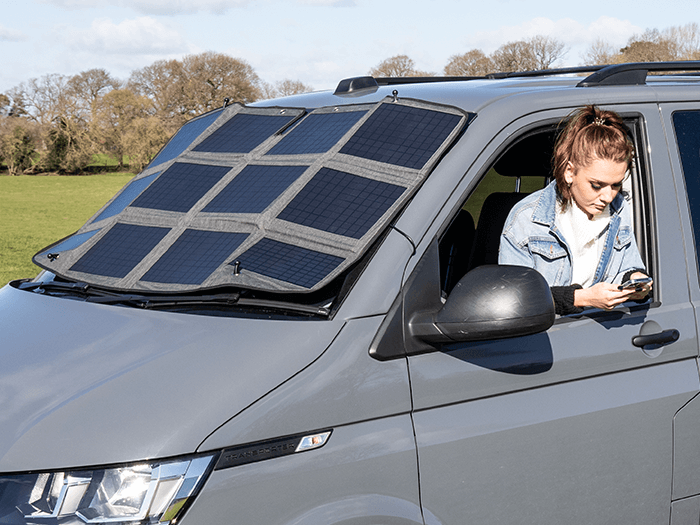
Introducing the exclusive JK Solar Charging Screen
We’ve designed and created the first fully portable, hassle-free, 120-Watt solar charging system for your vehicle – the JK Solar Charging Screen.

What are the Best Solar Panels for a Campervan?
Find out what are the best solar panels for a campervan, what size you need, and how much solar power is required.
At present, JK offers a couple of simple, easy-to-install split charging systems suitable for Splits and Bays, along with T4, T5 and T6 models.
To illustrate how straight forward the procedure is, we installed one in an Early Bay. You will require a 13mm spanner, a screwdriver, cordless drill, cutters, wire strippers, crimp tool, three suitable self-tapping screws and cable ties. You will also require a battery clamp and a leisure battery. As always, before commencing work, remove the earth (marked negative) lead from your main vehicle battery.
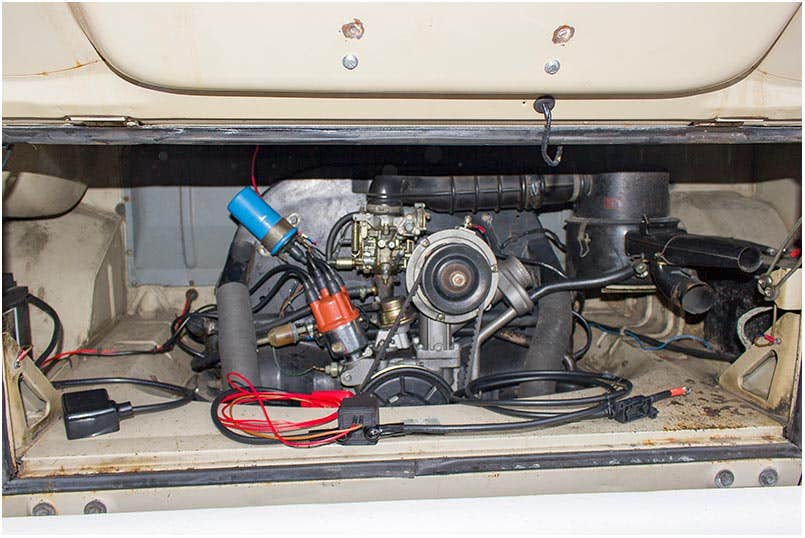
The design of the Bay Window makes it ideal for a leisure battery install as there is a spare tray on the left hand side of the engine bay. From this, lay the wiring loom across the back of the Bus, routing from left to right.
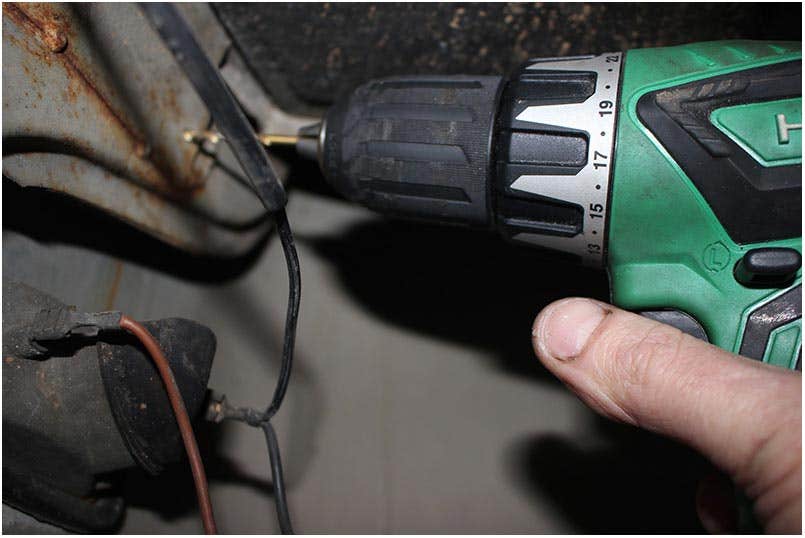
A good place to locate the relay is on the left hand d-post inner structure. Hold it in position and mark the top locating hole.
Drill this and mount the relay using a suitable self-tapping screw.
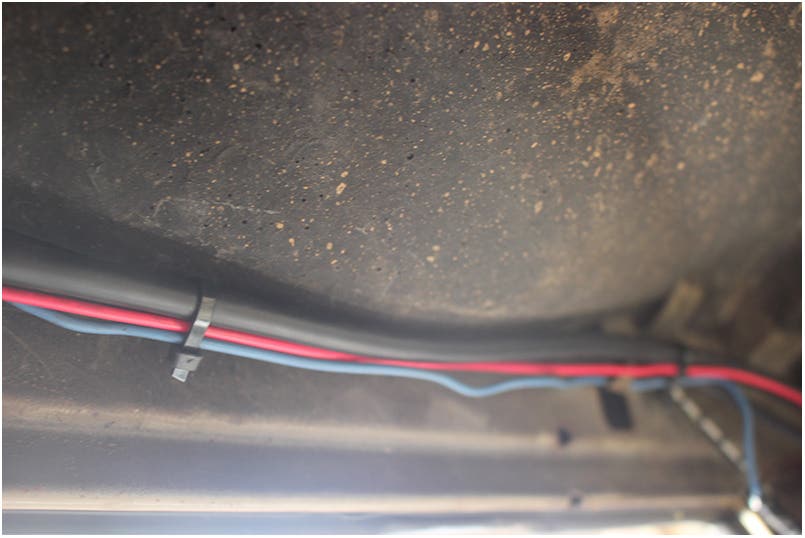
The wiring loom for the rear lights runs along the top of the inner engine lid hinge panel, held in place with metal tabs. Carefully prise these open and locate the new section of loom within. Alternatively, use cable ties to hold the new loom to the existing wiring.
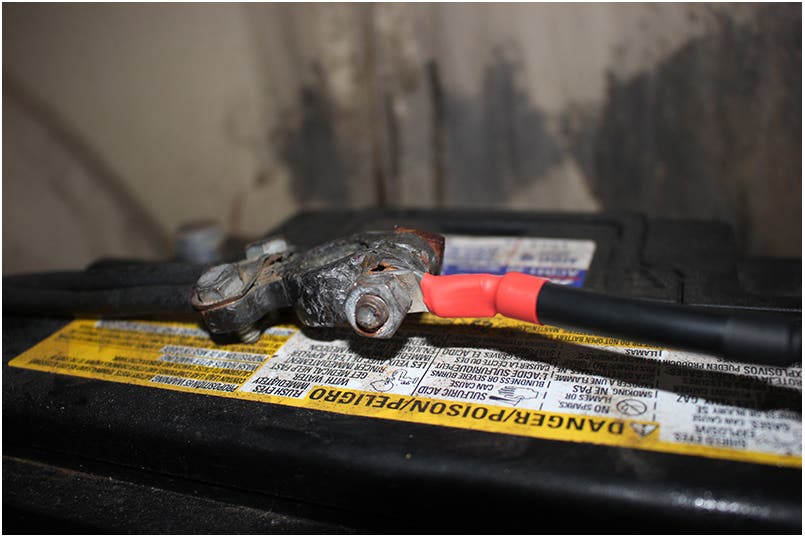
Remove the positive lead from the main battery and secure the new power lead under the battery clamp nut.
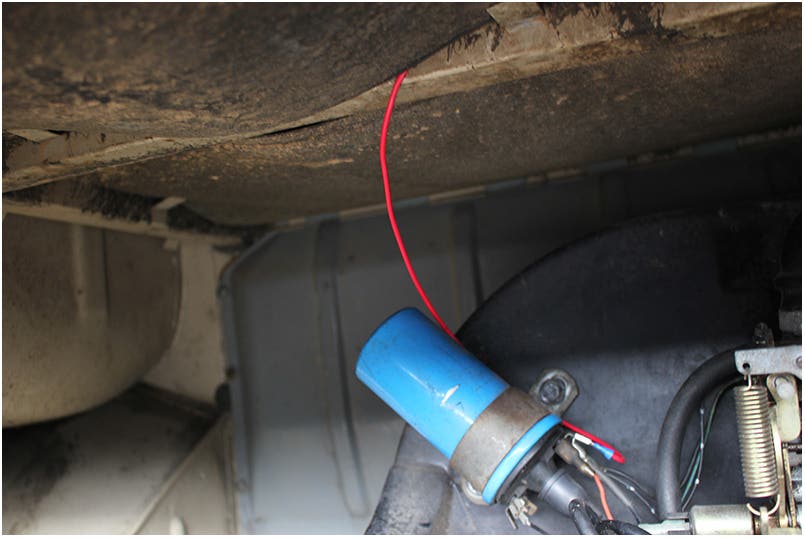
There are just two wires on the split charge relay. The brown wire goes to earth (we utilised the existing tail light earth for this) and the red (positive) wire needs to go to a switched live. For this, we routed the cable under the engine bay tar board and piggy backed it to the switched live terminal on the ignition coil.
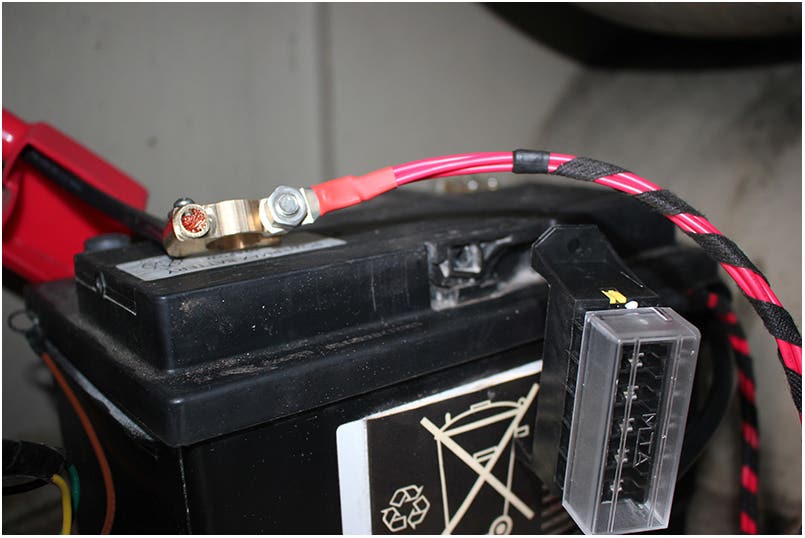
With the leisure battery in place, install the auxiliary fuse box loom under the battery clamp nut.
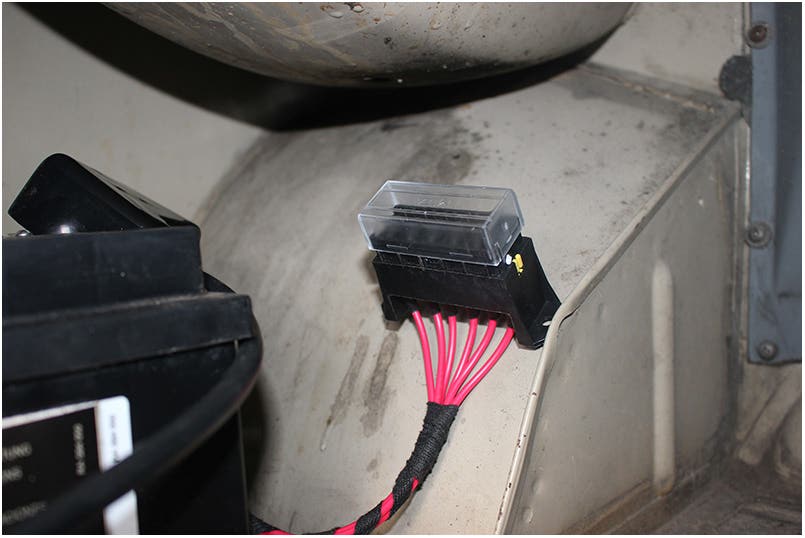
Then locate the fuse box on the rear inner wheel tub.
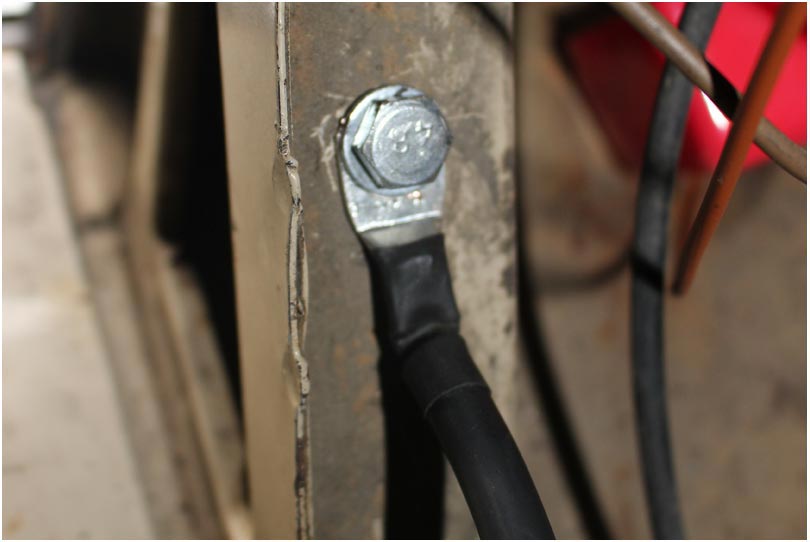
Next, install the leisure battery earth lead. This must be bolted to a good earth point. On our Early Bay, we found an existing, factory-drilled hole on the inner d-post support and elected to use that. If no such hole exists, use an 8mm drill bit to create one.
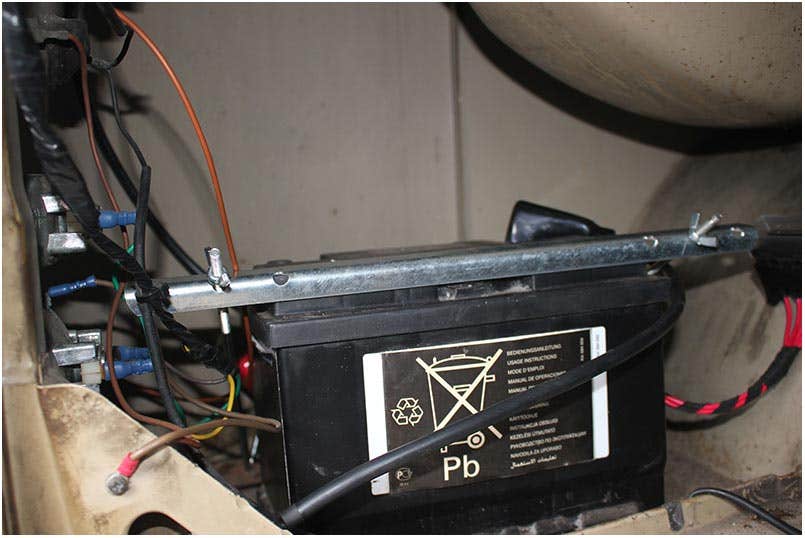
Finally, you don’t want your new battery sliding around, so we used a JK universal battery clamp to secure ours in place. Once installed, connect the positive leads on both batteries, then the earths. All should now be up and running, just leaving you to wire any accessories forward from the new fuse box.
Split Charging your Camper!
There’s nothing more frustrating than turning the ignition key at the end of a relaxing holiday or day out, only to hear the stomach-churning click that signals a flat battery. This is usually followed by at least an hours wait for your chosen recovery service to arrive. Not to mention the embarrassment!
Fitting a leisure battery and split-charge relay means you’ll never have that ‘will it / won’t it?’ moment again and can enjoy your time away in your Camper without worry.
In an attempt to make this essential upgrade as simple as possible, we’ve put together a range of easy-to-install kits with pre-made wiring looms, relays and fuse boxes connected. All you need to add is your choice of battery and a battery clamp.