

The T5 rock ’n’ roll bed we chose was sourced from www.vwrustylee.com for around £270, although prices here set to increase at time of going to press.
For the money, it represents an absolute bargain, but installation obviously requires a fair bit of work beneath the Van. We found we had to remove the spare wheel and rear under trays to gain access to drill the holes for the M10 8.8-grade, high tensile bolts that secure the framework of the bed to the floor, and it goes without saying that it is vital to ensure you’re not drilling into any pipes, lines or tanks that supply the life blood to your vehicle. This part of the process will be made significantly more complicated if your T5 is a 4Motion, as there are a lot more mechanical underpinnings to contend with.
One of the key considerations is to spread the load around the anchor points, either via spreader plates or substantial washers. Rusty Lee recommends a minimum of four, preferably six, mounting bolts be used for their beds, but check with your supplier if you’re unsure. Officially pull-tested beds have to withstand a serious amount of pressure to be certified but, if the installation is done poorly, even a pull-tested bed can be unsafe in the event of an accident.
There are also differences in the way different manufacturers’ beds mount. Some are fixed directly to the cross members underneath, and use existing indentations in the floor, but as every bed we have seen appears to be different, always read the instructions carefully, and measure twice, or more, before drilling any holes in your Van’s floor.
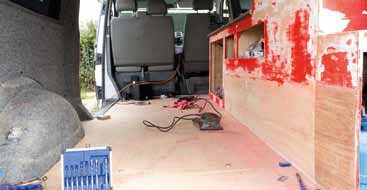 01 Our cabin area was already lined with 12mm ply when we bought this Van, so that gave us a good base to start from. Strip out any existing flooring / covering and consult the installation instructions that come with your rock ’n’ roll bed. They are not all the same and we would recommend using as many anchor points as possible, and using at least M10 8.8-grade high tensile bolts.
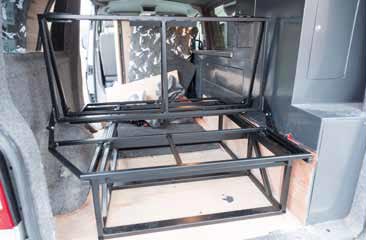
 02 Test fit where the bed will be placed in the Van in relation to your cupboards, fixtures and fittings. Mark the location of the fixing bolts that will hold the non-sliding / tilting part of the framework in place. Our bed came with M10 x 70mm high tensile bolts and Rusty Lee recommends a minimum of four (ideally six) to hold the framework in place.

03 If you can transpose your measurements, drill the holes from underneath the Van to make doubly sure you are not going to drill into anything important, though this will require you to jack the Van up and support it securely on axle stands before clambering around underneath. Remove the spare wheel and rear under trays to gain access to the floor where necessary and double check your interior and exterior measurements from key transferable points like the wheel arches. Always use spreader plates, or large washers behind the nuts.
 04 When applying sticky vinyl (we bought 10m of car wrap-quality vinyl from eBay) to existing chipboard or MDF, ensure the surface you’re sticking to is prepared for maximum adhesion and free of any lumps and bumps. As ours had been painted, we ran a DA sander over it to smooth the surface and leave an even finish. Note: you can also buy iron-on Melamine edging, should you wish to add extra protection to the edges of doors and the like.

05 We found applying the vinyl to be very labour intensive, and definitely not easy with the units fitted in the van. As a result, we removed the doors and covered them out of the Van. This job is definitely easier with two people.

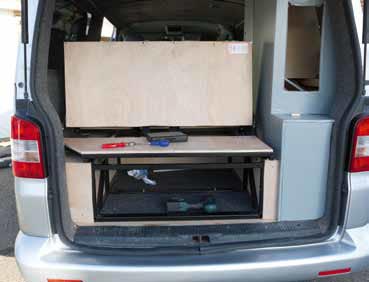
06 To keep costs down, our rock ’n’ roll bed was supplied without any upholstery or wooden panel work, so we made ours from 18mm structural ply. A jigsaw (and particle mask!) is vital for this job.

07 Here’s the end result of the cutting and shaping process. These panels are then screwed to the frame, and can then be covered with foam and your material of choice.
08 Be careful when re-fitting the bed frame as it is a tight fit and very easy to damage your new vinyl wrap. We used an offcut of chipboard to avoid scratching ours, then secured the frame in place using the high tensile bolts and spreader plates above and below the floor.
 09 With bed securely mounted in place, you can start making the under seat surround, either from plywood or MDF, for additional storage or as a cubby hole to stash a big subwoofer in.
 10 Don’t forget about your seat belts when you’re cutting panels to fit the frame. It is vital to leave a gap so they can loop through and meet the anchor points.
 11 Three-point seat belts with rock ’n’ roll beds generally attach directly to the factory pressed / drilled holes within the floor pan and pillars of a Panel Van. Again, ensure you use high tensile steel bolts at any anchorage points but, if you are at all unsure of what you are doing, please consult a specialist as it is very important this is done correctly.

12 Rusty Lee recommends a nice thick slab of four-inch foam for his beds, but whatever you use, make sure it is upholstery foam. There are many types of foam available, so you can spec the foam to your needs by combining, say, two inches of firmer foam with an inch of softer (cheaper) foam either side sandwiching it. Ensure it is fire retardant foam.
 13 Ta da! As if by magic, new camo curtains and seat covers appear (thanks mum!) and the fully-trimmed bed is now boxed in below for additional storage.

14 At a bit of hard-wearing carpet, a rug if you’re that way inclined, and you’re ready to hit the road. Have a look back at the picture at the beginning and you’ll see the end result is a million miles away from where we started the day before and, best of all, hasn’t cost the earth to do.